Building Prestashop module in just 1 minute
Ever wonder if one can ever create prestashop module in just a minute? Let’s check it out and see below.

Before we start, I would like to clarify first that we only creating the module structure, all the basic functions that a module’s need and some hooks to be used that will be generated automatically by Prestashop generator. Module content or what it does will be up to you after you finished this tutorial. Let's get started!
What is a PrestaShop module?
So, now that we are on it, let’s define first what is prestaShop module is. PrestaShop module is a small program that leverage PrestaShop features and modify or even extend them to make PrestaShop easier to use, more complete or more customized. Not only that prestashop itself are nearly to its complete set of features already but still there still some features that are most likely missing e.g., selling in batches of products and one can only order per minimum and divisible by X quantity that has set to certain product/s.
So, without further ado, let’s start building a very simple module on which will likely to become more productive as time goes by.
Create a PrestaShop module
In this post, we will be using Prestashop module generator to build a module.
Basic form:

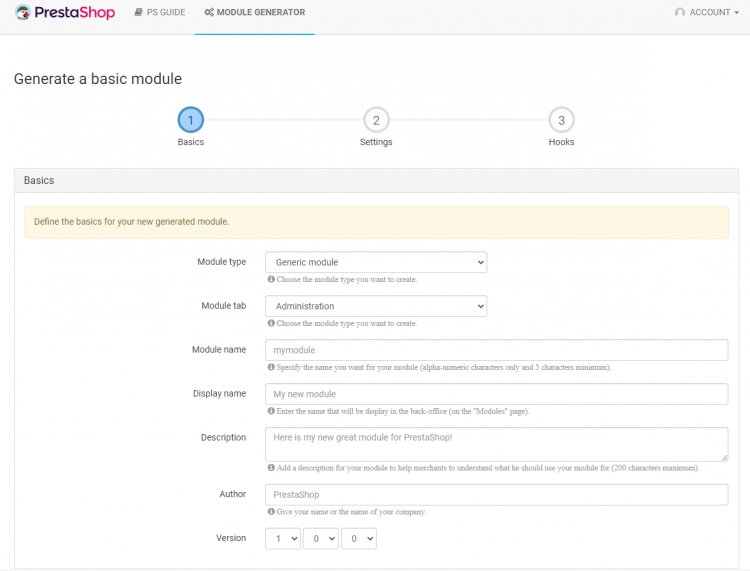
Figure 1. Basics form of module.
First, you need to decide what particular module you want to build. After deciding what to build, you can now start putting details like in figure above (see figure 1).
- Module type. It’s what your module’s most likely role. If its not on the list of what is it, you could choose Generic module
- Module tab. It’s only a module category on which your module belong.
- Module name. The technical name of your module. It has strict rule that must be 5 characters minimum and should never have a space.
- Display name. It will be the display name of your module which will found in back-office module page. Name can have a space and no minimum characters.
- Description. You will explain here what you module is all about, what does it do, so user can understand easily its purpose.
- Author. Most likely your name as the creator.
- Version. Version of your module. You can choose whatever you want here, but bear in mind, every module version differs its functionality. So, choose incrementally.
After you filled all the inputs in basic form, you can proceed to next step. We just consumed 30 seconds now, hurry up and let’s make this quick!
Settings form:

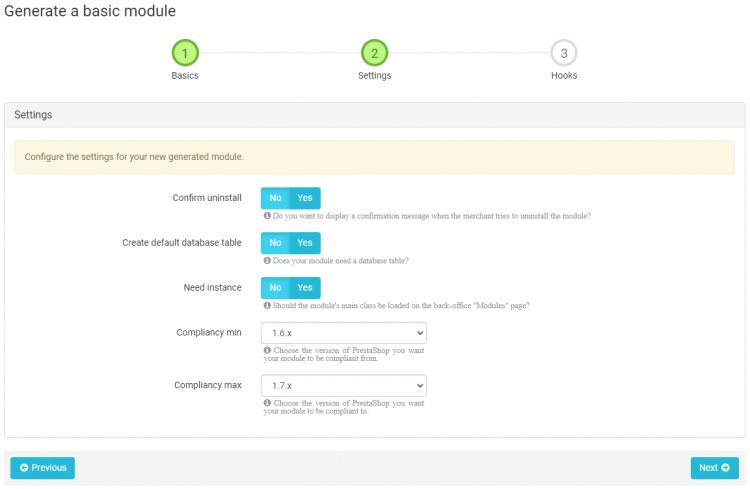
Figure 2. Settings of the module.
Whether your module hold data’s or not, has minimum and maximum compliancy or not, you should configure it as well. Don’t worry, settings you configured for all are still editable at the end. So, stay calm.
- Confirm uninstall. Do you want to display some sweet farewell message to those whose about to leave you but still you want to hold them back? Now’s the time to do it or not.
- Create default database table. Does your module hold precious data? Then you should consider it as yes.
- Need instance. You can set it to “No”. It’s a matter of module main controller new instance only.
- Compliancy min. The minimum version of prestashop your module can complied. If module installed lower than this version should expect unstable behavior of the module.
- Compliancy max. The maximum version of prestashop your module can complied. If module installed higher than this version should expect unstable behavior of the module.
We’ve just at the tip in the finish line!
Now that Settings form of module generation is done, let’s proceed to the last step.
Hooks:
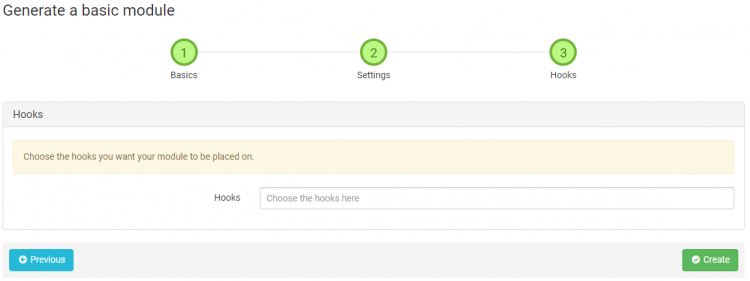
This part is for those who has advanced knowledge or has the idea about web hooks. You can choose to leave it blank or select hooks there, its up to you! Then, after that, our 1 minute building a module are done.

Figure 3. Hooks.
Hope you get something here, and if not, you can leave a comment below


